VR guide for Assetto Corsa and CSP
Under Review
NOTE
For further help or if you want to report a game issue, join the Custom Shaders Patch Discord and use the virtual-reality-talk channel.
The purpose of this guide is to help with basic VR setup and adjusting your settings for the best experience.
It also covers usage of OpenComposite and the OpenXR Toolkit.
This guide is written with Content Manager and Custom Shaders Patch in mind and is not intended to work with vanilla Assetto Corsa.
Huge Credit to ItsRaptyyy for letting us use his guide
TIP
Most people should only have to read up to video settings, beyond that is more in depth coverage of various settings which may not be needed.
1. Prerequisites
INFO
- Assetto Corsa v1.16.3/4 (64-bit only), installed via Steam.
- Latest version of Content Manager
- Latest version of Custom Shaders Patch unless said otherwise.
- Latest version of Pure (Delivers the best image in VR)
2. Basic VR setup
INFO
TIP
Click on your brand of headset to expand the instructions, you only need to use one of the provided methods.
Oculus / Meta
Oculus (Easy setup)
This is the easiest and for most users the best method
- First make sure that you have successfully set up Quest link or Air link and that the headset is connected to your PC - Tutorial how to do so
1.1. If youre using an Oculus Rift (S) then you simply need to have the headset connected and showing in the oculus app. - In the Oculus App, Settings > General enable "Unknown sources" and next to the "OpenXR Runtime" press "Set Oculus as active" (If its greyed out then you don't need to press it)
- In Content Manager go to Settings > Assetto Corsa > Video and set "Rendering Mode" to "Oculus Rift".
You do not need SteamVR for this
OpenComposite (Best performance)
Should deliver a similar experience to native Oculus but will let you use the OpenXR Toolkit
Can deliver better performance
Intended more for advanced users
- First make sure that you have successfully set up Quest link or Air link and that the headset is connected to your PC - Tutorial how to do so
1.1. If youre using an Oculus Rift (S) then you simply need to have the headset connected and showing in the oculus app. - In the Oculus App, Settings > General enable "Unknown sources" and next to the "OpenXR Runtime" press "Set Oculus as active" (If its greyed out then you don't need to press it)
- Set up OpenComposite, instructions here
- In Content Manager go to Settings > Assetto Corsa > Video and set "Rendering Mode" to "OpenVR"
Using this method you can also look into the OpenXR Toolkit
Virtual Desktop
Virtual Desktop can potentially deliver a better experience but it is also paid.
- Purchase Virtual Desktop on the Oculus / Meta store (do not buy it on steam itself)
- Follow the instructions provided in Virtual Desktop to connect your headset to your PC (Quest / Air Link is not required).
- Open the Virtual Desktop Streamer application, and under settings, select VirtualDesktopXR (VDXR) as the OpenXR runtime.
- Set up OpenComposite, instructions here
- In Content Manager go to Settings > Assetto Corsa > Video and set "Rendering Mode" to "OpenVR"
SteamVR
Generally not recommended to use
- First make sure that you have successfully set up Quest link or Air link and that the headset is connected to your PC - Tutorial how to do so
1.1. If youre using an Oculus Rift (S) then you simply need to have the headset connected and showing in the oculus app. - Install and set up SteamVR from Steam
- In Content Manager go to Settings > Assetto Corsa > Video and set "Rendering Mode" to "OpenVR"
Oculus / Meta additional notes and troubleshooting
- If you're using the USB cable and quest link (wired) set the encode bitrate to 500mbps or higher in the Oculus Debug Tool. More info about the Oculus Debug Tool here.
- Game lagging when using the headset wirelessly: Your router might not be able to handle the high amount of bandwidth required for a smooth experience, this will generally show as high network latency. Try to lower the bitrate in the Oculus Debug Tool or set it to 0 for auto bitrate.
- When using USB-C make sure your headset runs at USB 3 and not USB 2 speeds (Should be around 1.5Gbps or higher), if it keeps connecting via USB 2 even with a new cable and using a USB 3 port, reset your headset to factory defaults which will fix the issue.
SteamVR headsets (Vive, Index, Bigscreen beyond)
Native SteamVR
- Make sure your headset is connected to your PC
- Install and set up SteamVR from Steam
- Some headsets might require an additional driver or utility to function correctly, follow the provided instructions for your headset.
- In Content Manager go to Settings > Assetto Corsa > Video and change "Rendering Mode" to "OpenVR"
Windows Mixed Reality headsets
Using Oasis SteamVR driver (Recommended)
- Make sure your headset is connected to your PC
- In Content Manager go to Settings > Assetto Corsa > Video and change "Rendering Mode" to "OpenVR"
Using OpenComposite
Use this ONLY if the Oasis SteamVR driver doesn't work for you
- Make sure your headset is connected to your PC
- Install and set up Windows Mixed Reality from the Microsoft Store
- Install and set up OpenXR Tools for Windows Mixed Reality from the Microsoft Store
- If you see a button that says "Set as active runtime" - press it.
- Set up OpenComposite
- In Content Manager go to Settings > Assetto Corsa > Video and change "Rendering Mode" to "OpenVR" Using this method you can also look into the OpenXR Toolkit
Pimax Headsets
Using OpenComposite (Recommended)
- Make sure your headset is connected to your PC
- Install and set up Pimax Play
- Set the OpenXR Runtime to Pimax OpenXR in Pimax Play
- Set up OpenComposite
- In Content Manager go to Settings > Assetto Corsa > Video and change "Rendering Mode" to "OpenVR"
Using this method you can also look into the OpenXR Toolkit
Using SteamVR
- Make sure your headset is connected to your PC
- Install and set up Pimax Play
- Install and set up SteamVR from Steam
- In Content Manager go to Settings > Assetto Corsa > Video and change "Rendering Mode" to "OpenVR"
3. Resolution and Reprojection
INFO
Resolution
Unlike monitors, VR headsets dont have a "native" resolution because of barrel distortion which reduces detail in the center part of the image, to counteract that we need to supersample - use a higher resolution.
It is important to set the resolution as high as possible while also trying to avoid sacrificing performance.
Start with 100% or 1.0x resolution (can also be called render scale) and adjust as needed based on Quality and Performance.
On some headsets (like Pimax) 100% can already be very high resolution, you might have to lower it to get good performance.
Oculus / Meta
You can adjust it in the Oculus app (Settings > Graphics Preference > Render Resolution) Or in the Oculus Debug Tool with the Pixels Per Display Pixel Override setting.
Steam VR
You can adjust it in SteamVR settings > Video > Render resolution (Set to custom).
Windows Mixed Reality
You can adjust it in OpenXR Tools for Windows Mixed Reality (Custom Render Scale).
Pimax
You can adjust it in the Pimax Play software (Render Quality).
WARNING
The Resolution in Content Manager Settings > Assetto Corsa > Video does NOT affect VR resolution.
Reprojection
Reprojection reduces system load by halving the amount of rendered frames and extrapolating the rest to maintain a smooth experience, very similarly to frame generation.
For example - Using a 90Hz headset, your PC would need to render only 45 fps, the rest being generated by reprojection.
However, it may cause artifacts, input delay, or stuttering (if it's switching between reprojection on or off).
Oculus / Meta
You can set it in the Oculus Debug Tool with the PC Asynchronous Spacewarp setting. (Debug tool can sometimes not honor the setting and ignore it).
Alternative method: Download this archive
Run "oculus disable asw.reg" to disable ASW, or "oculus enable asw.reg" to enable it.
Steam VR
You can set it in SteamVR settings (Video > Motion Smoothing).
Windows Mixed Reality
Uou can set it in OpenXR Tools for Windows Mixed Reality (Motion Reprojection Rate).
Pimax
You can set it in the Pimax Play software (Smart Smoothing).
INFO
Any headset using OpenComposite and the OpenXR Toolkit can also adjust Resolution and Reprojection through the OpenXR Toolkit.
4. Video and CSP Presets
INFO
WARNING
Save your current settings as presets in Content Manager for Video and Custom Shaders Patch!
Video Presets
If you don't want to read through the sections below, try each each of the presets and see what works best. These are some video presets made by Raptyyyand should be adjusted to your needs. Make sure to double check the Rendering Mode so that its set correctly for your headset !
- High Performance: Link here (Disable post processing if you need even more performance)
- Balanced: Link here
- High Quality: Link here (For best graphics find a good pp filter)
TIP
You don't need to use frame limiters in VR since the framerate will be capped to the headsets refresh rate anyway. Using fps limiters can potentially cause performance issues.
CSP Presets
These presets are simply to be used as a base for your own preference. Test the presets out and adjust as needed.
- High Performance - Link here (This preset has a lot of modules disabled for a little extra performance)
- Balanced - Link here
- High Quality - Link here
WARNING
Foveated rendering / Nvidia VRS is NOT enabled in any of these, read the chapter about Foveated Rendering here
5. What is Foveated Rendering
INFO
WARNING
Note that since Assetto Corsa is a DirectX 11 game, Foveated Rendering works ONLY on Nvidia 16xx, 20xx, 30xx and 40xx series GPUs or newer.
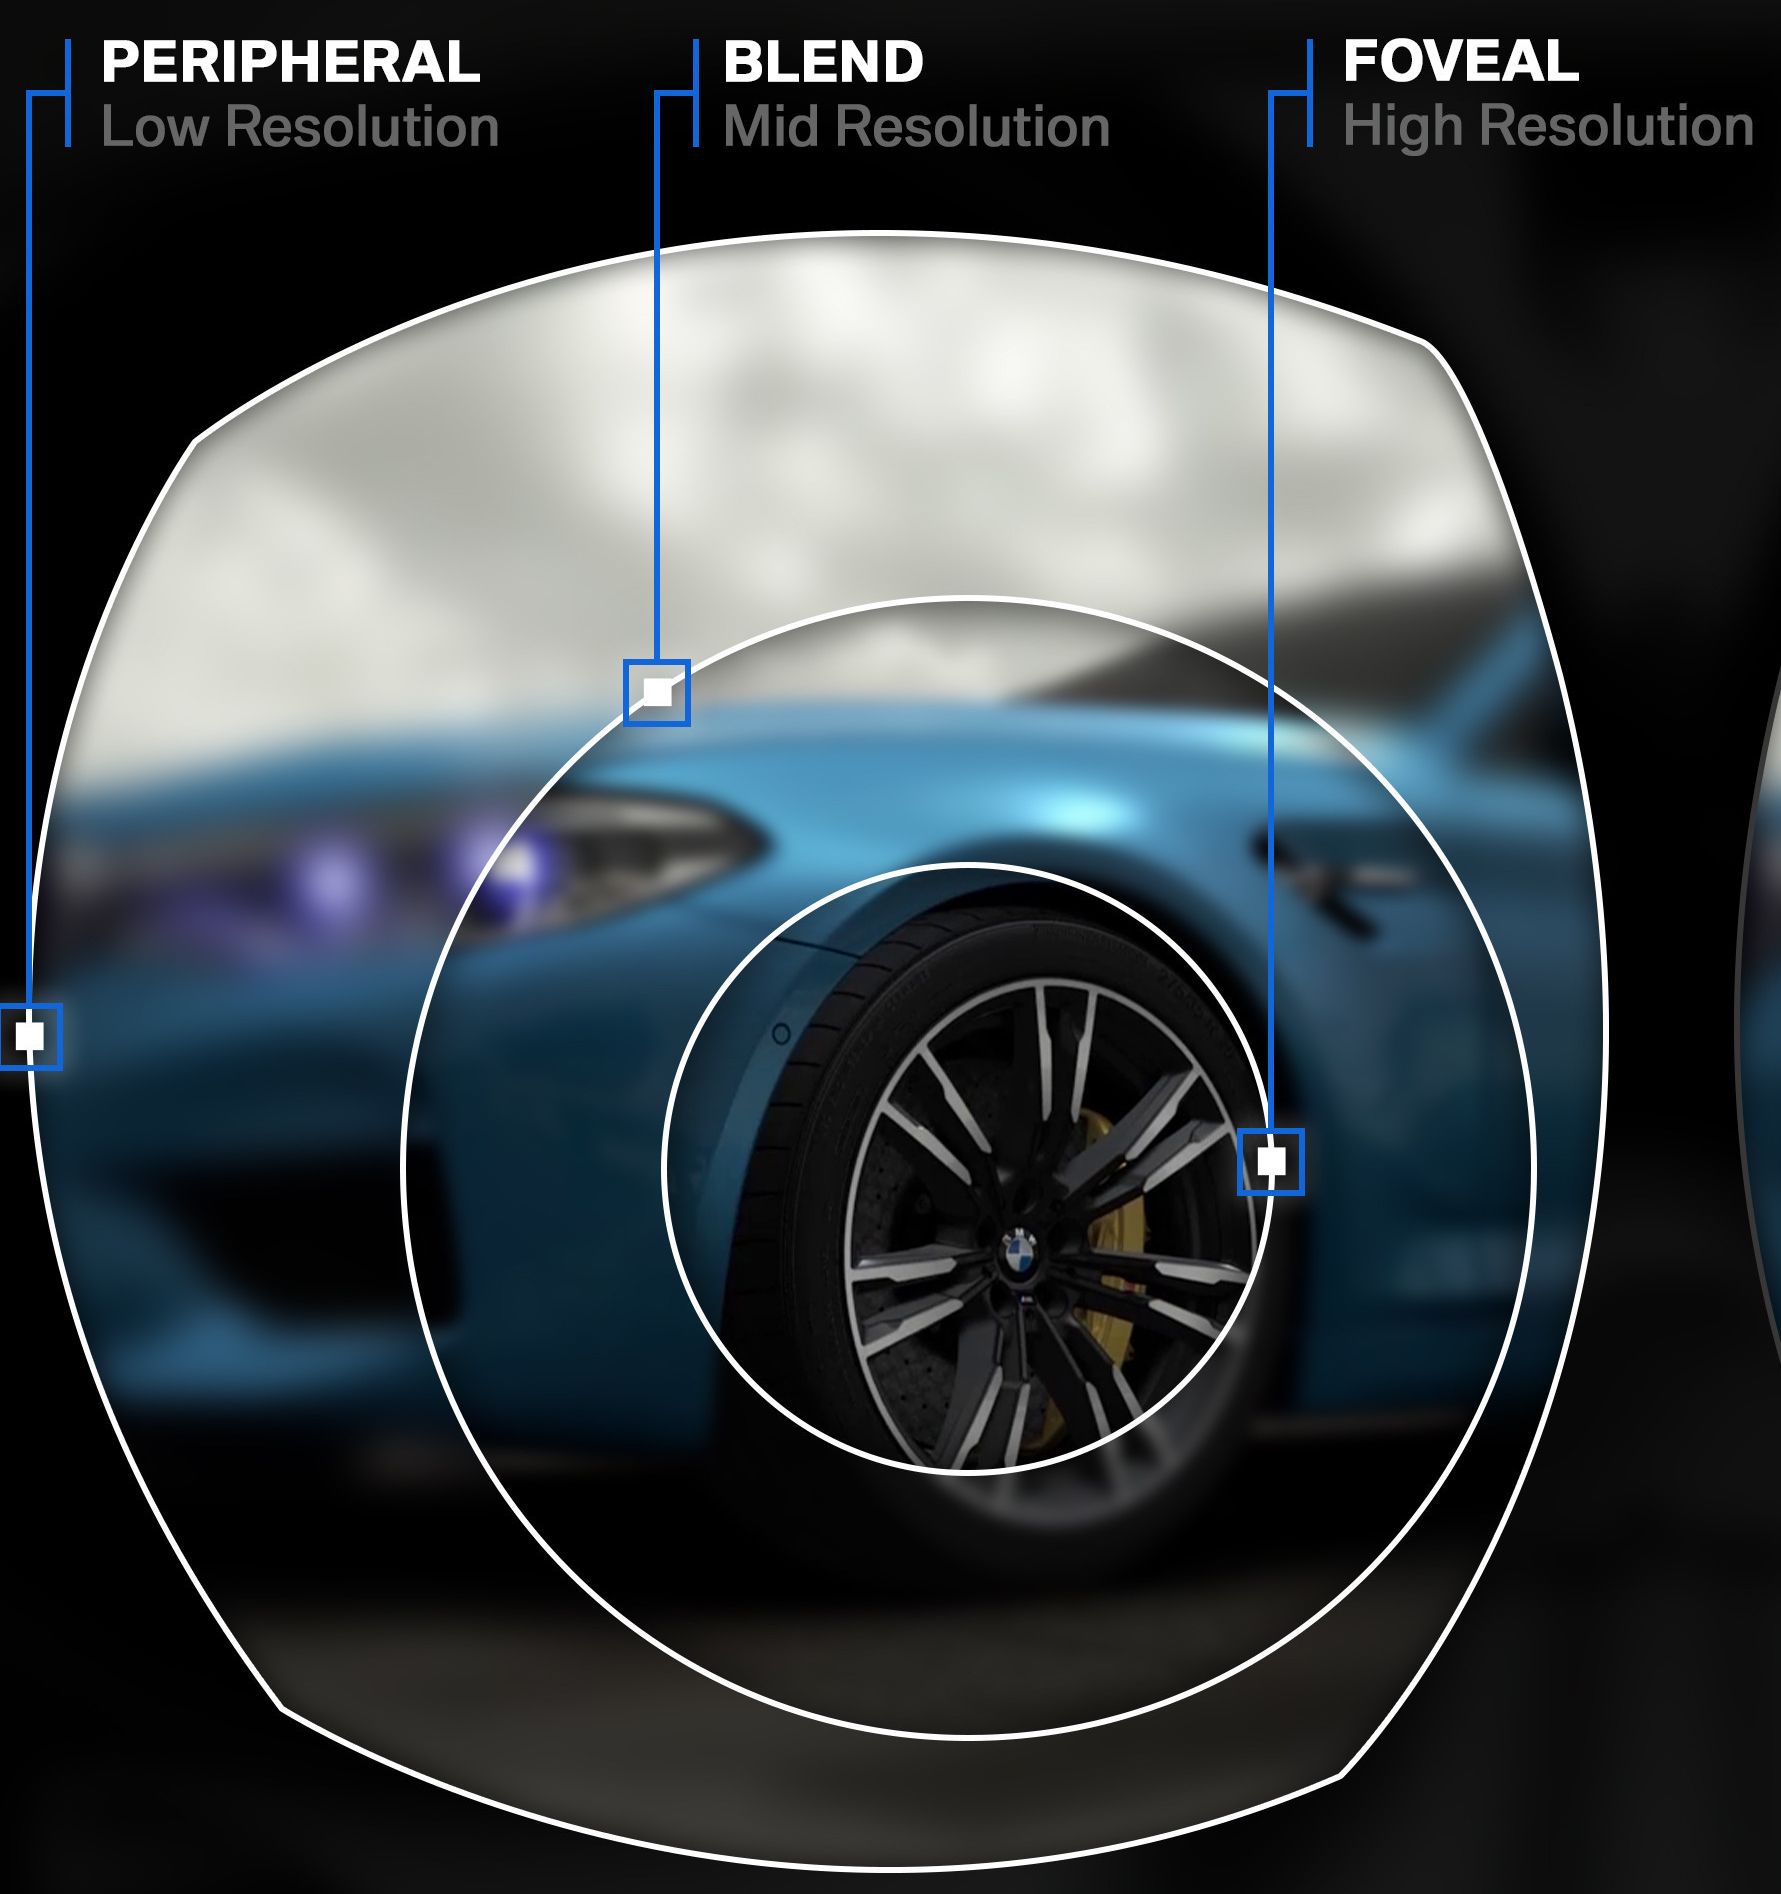
Foveated rendering helps to achieve greater performance in VR by rendering the outer parts of the image at a lower resolution as shown in the example below. This makes sense on most headsets as only the center part of the lense is in focus and can display the image clearly.
Foveated rendering is the biggest performance increase (GPU load wise) that you can get in VR so it is highly recommended to take advantage of it.
Some headsets with eye tracking can support Dynamic Foveated Rendering (more info about this in the future)
TIP
Foveated rendering might be easily noticeable on headsets that use pancake lenses with large sweetspots such as the Quest 3 or Pico 4, on such headsets it is recommended to use a very large center ring.
Ways to enable / use Foveated rendering (Use only one of these methods):
- Enable
Nvidia VRSin Custom Shaders Patch, explained further here (Recommended for most users) - Enable
Foveated Renderingin theOpenXR Toolkitif you're using OpenComposite, explained further here (Gives more adjustability compared to Nvidia VRS, intended for Advanced users) - For Pimax users you can enable
Foveated RenderinginPimax Play(More convenient but less options compared to the OpenXR Toolkit)
6. Video / CSP Settings
INFO
Video Settings
This covers all the settings in Content Manager > Settings > Video
INFO
Note that in Content Manager > Video most settings have an ! icon next to them that will show what each setting does and the performance impact.
Resolution and FPS
Rendering Mode should already be set depending on your headset as shown above. Fullscreen will simply display the game in Fullscreen instead of a window, recommended to have it enabled as it slightly helps with performance but its not a must. Resolution doesnt really matter for VR use, it will only set the game window size, does not affect VR image quality. Virtual synchronization is not needed, keep it disabledLimit framerate is not needed in VR as the headset will limit fps as needed by itself, keep it disabled.
Quality
MSAA (Multisample anti-aliasing) is an Anti-Aliasing technique which helps with jagged edges, pixelation or shimmering especially into the distance. Highly recommended to keep it enabled in VR, either 2x or 4x. 8x will have a major impact on performance and is generally not worth using. Anisotropic Filtering helps with texture clarity into the distance, it has a no performance impact so it's recommended to just keep it at 16x. World details will affect object count on tracks (if they support it), set it as needed. Can also be adjust in-game using the "View & Video Settings" app. Shadows resolution affects how sharp the shadows will look. Higher resolution will make shadows look better but decrease performance. I would recommended using 1024x1024 and increase if performance isnt an issue. Smoke generation simply controls the smoke quantity, adjust as needed, but I would recommend using CSP smoke instead (Custom Shaders Patch > Particles FX > New smoke and dust)
Reflections
Reflection Resolution simply adjusts how sharp / clear the reflections will look, 512x512 is a good base value to start with, can increase if needed. Rendering frequency adjusts how frequently the reflections will update. Set it to two faces per frame, any higher is not really needed as they get reprojected anyway. Don't use Static either as it will cause issues with Pure. Rendering distance Adjusts the reflection rendering distance, does not have a noticeable performance impact so you can set it to at least 1000m or higher if needed.
Post-Processsing
Enable post-processing effects this enables post processing in general, very useful to have to improve the graphics and look of the game, however has a big performance impact. Most PCs should have it enabled but low-end PCs should probably disable it on more demanding servers. Overall Quality sets the post processing resolution, High is a good middle ground performance wise but can also just set it to Maximum. Glare Quality sets the quality of glare effects, High is a good middle ground performance wise but can also just set it to Maximum. Depth of field adjusts the depth of field quality, only works in replays so can keep it Off if you don't care about it. Motion blur not recommended to use with VR, set it to OffSaturation is basically the intensity of the colors, keep it at 100% and adjusts colors in Pure instead if needed. Heat shimmering adds a heat shimmering effect, set as neededSunrays enables sun rays / god rays / sun shafts, set as neededFXAA is an anti aliasing technique, keep it enabled as it is required for some CSP functionality but will not affect image quality in VR.
Mirrors
Mirror resolution how sharp / clear the mirrors will look, higher resolutions will reduce performance, 256x1024 is a good base value High quality enables additional effects in the mirrors and increases the rendering distance (from 400 to 800 meters), will reduce performance, recommended to enable.
Oculus (only affects Oculus / Meta headsets)
Pixels per display is same as resolution multiplier in the oculus app or oculus pixels per display pixel override in oculus debug app, set as neededMirror texture enables the game window to show your VR view, recommended to have it enabled
System
I would recommend not messing with these settings as they don't really have any meaningful impact and can cause issues.
CSP Settings
This covers all relevant settings in Content Manager > Settings > Custom Shaders Patch
INFO
Not every setting in CSP will be covered(that would be a lot), but only the ones that matter for VR performance.
General Patch Settings
Audio > Decompress Samples recommended to have it enabled. Reduces CPU overhead for higher memory (RAM) usage. New KN5 loader recommended to have it enabled, reduces RAM and VRAM usage.
CPU optimizations:
- Flatten nodes keep it
enabled - Chunks optimization helps with CPU load. Set it to
Advancedunless you have issues (like the screen going black), then keep it atBasic. - Limit audio for other cars set it to
Alwaysif you have a slower PC. - Apply Hyperthreading fix highly recommended to have it
enabled, benefits any CPU that uses Hyperthreading or SMT. Might not work well on 4 or 2 core CPUs. (Requires CSP version 0.2.7 / 0.2.8 preview or newer)
GPU optimizations:
- Optimize meshes some more helps with GPU load, have it
enabled - "Deduplicate meshes" helps with VRAM, have it
enabled - "Upgrade AC textures" can improve loading times and reduce VRAM usage, recommended to have it
enabled. Will make the game folder size bigger (shouldnt be more than 5GB for most users). - "Deduplicate textures" can potentially lower how much VRAM the game uses but can also cause graphical issues or game crashes, use with caution. For most users I recommend keeping this
disabled
Extra FX
Extra FX doesnt work in VR so this will have no effect, keep it disabled if you don't ever use Extra FX.
GUI
New driver tags recommended to have it enabled so you can see driver names in VR. Its not a performance tweak but a very useful thing to have.
Font Scale Set this to 125% or higher if you struggle reading the names.
Graphics Adjustments
AMD FidelityFX SuperResolution also known as "FSR" is an upscaler that can help with performance by rendering the game at a lower resolution and then upscaling the image. Should only be needed for lower end PCs. Can also be used through the OpenXR Toolkit.
LOD settings:
- Force low-res drivers for other cars in first person view have it
enabledfor performance - Multiplier for car LODs this sets how far away the car LOD (level of detail) will change, lower multiplier will help with performance but can make cars look worse up close, for performance set it to
75%. - Multiplier for track LODs same thing as car LODs but for the track, I would recommend not going below
80%as it can cause issues. - Multiplier for trees LODs same thing as car LODs but for 3D trees, you can set it to
0% for best performanceif you don't care about 3D trees (makes them 2D instead), otherwise keep it around100%. - Add extra collider-based LODs for distant cars will make low quality LODs for cars that don't have them, can help a lot in dense lobbies like VDC, recommended to have it
enabled. Set the "Limit LODless cars" to a low value between 5 to 10 for best performance.
Post processing antialiasing set to disabled as post process AA doesnt work in VR (Will update this if it changes) Accessible color buffer > Full resolution for better quality set to disabled for a tiny boost in performance Draw grooves over track, but before dynamic entities Can help with performance but can also cause issues on some tracks (Like mirror / see through roads), use with caution.
Lighting FX
Cars casting lights set this to a lower amount like 5 for better performance in dense lobbies, lights are expensive performance wise. Disable mirroring in first person view helps with performance a bit, have it enabledEnable lighting in reflections disabled for a performance boost
Neck FX
Not related to performance but there are good NeckFX scripts for VR to enhance immersion or comfort, here are two most popular ones:
- AC Head Physics fancier script, has more movement
- NeckFX LUA script more basic, static script.
Smart Mirror
Custom render distance enabled and set the distance to 400 meters if you use High Quality mirrors in video settings, helps with performance. Real mirrors highly recommended in VR, makes the mirrors change perspective based on your head movement also lets you adjust mirror positioning through the "Car Mirrors" app in-game (Install it from the "App Shelf" app in-game first)
- Active
enabled - Alter FOV This will change the Field of View of the mirror depending how close you are to it. Set based on your preference, I have it
disabled - Refresh rate per frame set to
Update single reflection per framefor best performance, can look a little laggy on lower refresh rate headsets, use higher if needed.
Weather FX
Weather style this should be set to either Pure Gamma or Pure LCS. Pure Gamma is the recommended option as of now and has better performance, Pure LCS is able to produce a better looking image but could cause some issues too. Replace YEBIS with lightweight alternative is a more basic post-processing implementation which uses less CPU and GPU resources, for performance I would recommend to enable it. Does not work with some pp filters like C13, can also cause excessive glare. Automatically guess white reference point This can make the UI very bright when using Pure, disable it.
Mode Tweaks VR:
Make sure the extension is enabled (Active)Single Pass Stereo Highly recommended to have it enabled, especially on slower CPUs. It renders both eye images at the same time into one packed Render Texture, meaning that the whole Scene is only rendered once, and CPU processing time is significantly reduced. Can make some Pure shaders not work. Single YEBIS pass Have it enabled for best performance if needed. Instead of running post-processing individually for each eye, runs it once for both eyes. Can potentially affect glare effects in an undesirable way.
Nvidia VRS
Also known as Foveated Rendering, only works for Nvidia GPUs.
If you want to use Nvidia VRS (Requires Single Pass Stereo to be enabled):
- Nvidia VRS
enabled - VRS preset
Custom - VRS rate
High performance, can set to Highest performance if you need every bit of performance but it will be more visible. - VRS detailed area
Balanced, set it toWideif you use a Quest 3 or Pico 4 as they will show foveated rendering more clearly. You can also test using the VRS presets if those work better for you.**You can use the VR Tweaks app that lets you adjust all these settings (and more) in-game which you can find here:VR Tweaks
Corners masking optimization Recommended to keep this one enabled. Also known as Hidden Area Mesh, it allows your GPU to not waste time rendering parts of the image that you wouldnt be able to see because of how the lenses work. Disable this if the black shape in the VR mirror (game window) is undesired.
Custom VR HUD rendering This is not a performance related setting but its recommended to keep this enabled as it makes the HUD work better in VR. To adjust the HUD settings I'd recommend to use the VR tweaks app mentioned above.
7. OpenComposite and OpenXR Toolkit
INFO
OpenComposite
- Translates OpenVR games to OpenXR which means SteamVR isnt needed to run the game (Except for SteamVR headsets), it is highly recommended for users wanting more performance.
- On some headsets like Rift, Quest, Pimax or WMR - SteamVR simply acts as a middle layer which increases resource usage while bringing no real benefit to your VR experience.
- OpenComposite can also be used with Virtual Desktop when using it with VDXR, more info here
DANGER
Using OpenComposite with native SteamVR headsets (Vive, Index, Beyond) wont allow you to bypass SteamVR as it is required for the headset to function. However it would give you access to the OpenXR Toolkit if needed.
Pico standalone headsets dont have their own OpenXR runtime, so to bypass SteamVR you would need to use Virtual Desktop with VDXR and OpenComposite.
To install OpenComposite:
- Download the OpenComposite dll from one of the links
A. From this repository
B. From the OpenComposite mirror - Make sure the file is called "openvr_api.dll" (rename it if needed)
- Place the file to "steamapps\common\assettocorsa\system\x64", overwrite files if prompted to.
- In Content Manager > Settings > Video set "Rendering Mode" to "OpenVR"
- You also need to make sure your headset is using its native OpenXR Runtime (or VDXR for Virtual Desktop) and not the SteamVR one
WARNING
If you encounter any issues using OpenComposite, I have the original dll file uploaded here, rename it to "openvr_api.dll", put it in the same location as the opencomposite dll and overwrite, this will remove opencomposite.
OpenXR Toolkit
- OpenComposite also lets you use the OpenXR Toolkit which brings additional features like upscaling, foveated rendering, world scale or field of view adjustability and more. Read more about it here
- Download the OpenXR Toolkit here
- By default you use Ctrl + F1 to F4 to navigate the on screen menu, this can be changed in the OpenXR Toolkit Companion App. Explained further here
Recommended settings for the Toolkit:
- Upscaling set to
FSRif you need more performance, the lower the scale the more performance you will gain while sacrificing image quality. Set toCASto improve image quality by sharpening the image, use 70% to 100% strength. - Foveated rendering set to
Preset - Quality - Balanced, this will be a good starting point, adjust as needed.Customwill allow you to tweak things further. - Tweaking the
World Scalein the Appearance tab could fix any issues regarding objects looking too big or too small. - For users wearing glasses you might be able to lower the
Field of View (FOV)which can increase the image quality without any performance loss.
8. Additional Notes
INFO
For Virtual Desktop & Pimax Users
There is another guide written by CSOCSO which has some more in depth details for Virtual Desktop and Pimax users. You can find it here.
Performance
When it comes to VR performance, the most important thing is having a consistent framerate. You want to utilize your GPU as much as possible by increasing the headsets resolution or graphical settings, but also leaving enough headroom to avoid any fluctuation in framerate. You can use things like Render Stats app in-game, SteamVR performance graph, OpenXR Toolkit advanced overlay or programs like GPU-Z to monitor GPU and CPU usage and adjust settings as needed.
On some systems using HAGS (Hardware accelerated GPU Scheduling) can potentially cause performance issues (Especially on windows 10 or if you are using OBS), you can change it in Windows Settings > System > Display > Graphics settings or just search for "GPU" in the start search, requires a system restart to apply.
Headset adjustments
If your headset has built in IPD (inter-pupillary distance) adjustment it is important to set it correctly to have the best image quality and correct world scale, there are various ways to figure out what your IPD is, read more here. Most people should be in the 60mm to 70mm range.
If you are far or near sighted and wear glasses or contact lenses, the same thing will apply to you in VR so you will also need to wear glasses or contact lenses while you're using VR.
Field of view is an important aspect in VR as it can greatly impact the immersiveness of your experience. Basically the closer your eyes are to the lenses the higher your Field of View will be (up to the limitations of the actual headset). Users wearing glasses will usually have to sacrifice some Field of View for comfort.
Nvidia Control Panel tweaks
Anisotropic Filtering
Setting Anisotropic Filtering in the Nvidia Control Panel can potentially improve texture quality. Set it as shown in the image below.
MFAA (Multi-Frame Anti-Aliasing)
MFAA is an anti-aliasing technique which by alternating AA sample patterns both temporally and spatially can improve the quality of MSAA.
4xMFAA (2xMSAA + MFAA) has the performance cost of 2xMSAA, with anti-aliasing properties equivalent to 4xMSAA.
Requires MSAA to bet set to atleast 2x in Content Manager > Settings > MSAA
Miscellaneous tweaks
Using overlays (like Discord, Steam, Nvidia overlays) can potentially affect VR performance in a negative way, it is recommended to disable them when using VR.
Having hardware acceleration enabled in various programs (like Steam, Discord, Spotify) can potentially affect VR performance in a negative way and also use additional VRAM, it can be worthwhile to disable hardware acceleration for such programs.
9. Advanced Tweaks
DANGER
These tweaks are meant to be used only if you understand what they do and how to revert them if needed, not recommended for most people.
CPU Affinity
Using only one CCD (Chiplet) on a multi CCD AMD CPU (12 or 16 core)
- Install and open Process Lasso
- Run Assetto Corsa (Ideally in windowed mode)
- in Process Lasso find acs.exe, right click, select CPU Affinity > Always > Select CPU Affinity
- Select only the first half of the available CPU cores (CCD0)
- Press Ok
- Set Process Lasso to run the Governor at startup, click Options > General > Startup options at the top.
This can also be done using Process Governor if you wish not to use Process Lasso.
INFO
If you wish to undo this, in step 3 simply select None for the CPU affinity and then disable Process Lasso at startup.
Example of the performance difference using various affinities (mainly note the 0.2% and 1% lows)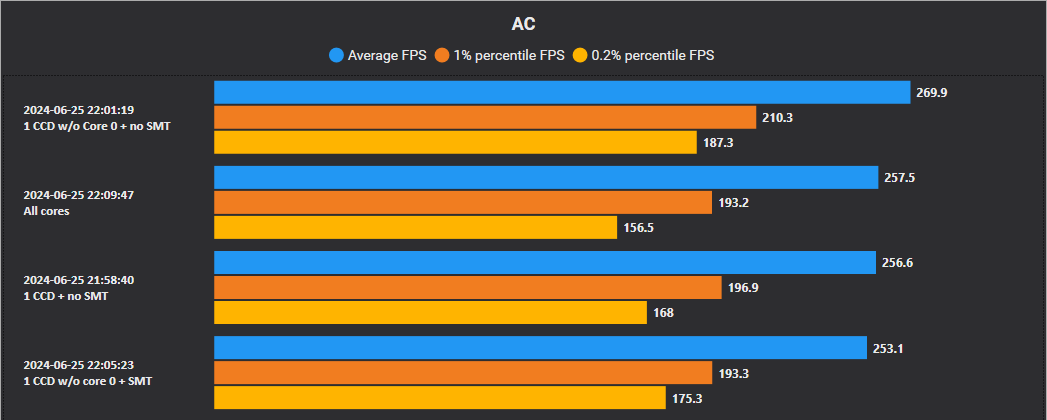
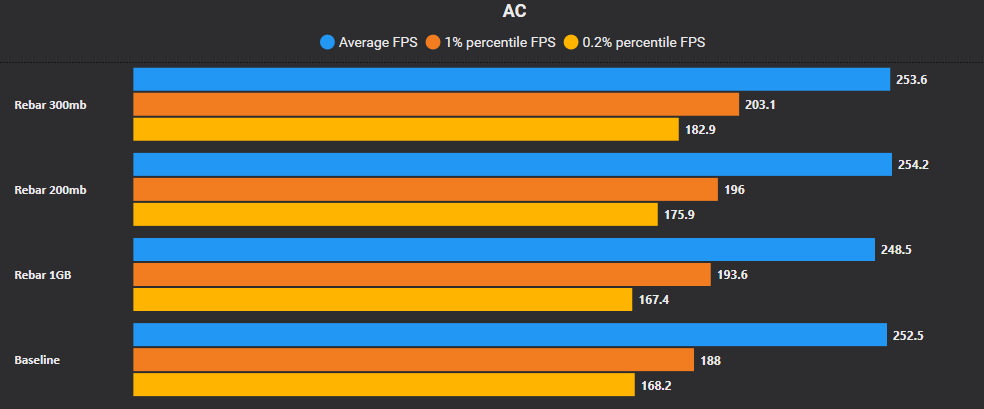
Nvidia ReBar
You can read about Nvidia ReBar here
Make sure Resizable Bar is enabled and supported on your system, its explained in the link above.
- Download Nvidia Profiler Inspector here
- Click on the Profiles selection bar and type in Assetto Corsa, then select it
- Under 5 - Common find rBAR, set Feature to "Enabled" and Size Limit to 0x0000000012C00000 (Paste it in)
- Press Apply changes in the top right
INFO
If you wish to undo this, set rBAR - Feature to "Disabled" and press Apply changes
Comparison of performance difference when using ReBar, baseline is ReBar disabled (default), 0x0000000012C00000 is 300mb